

How To Repair Water Damaged Wood Under Sink
I'chiliad a DIY-er that has tackled some pretty daunting abode comeback projects. I dearest to share my experiences on different online platforms!
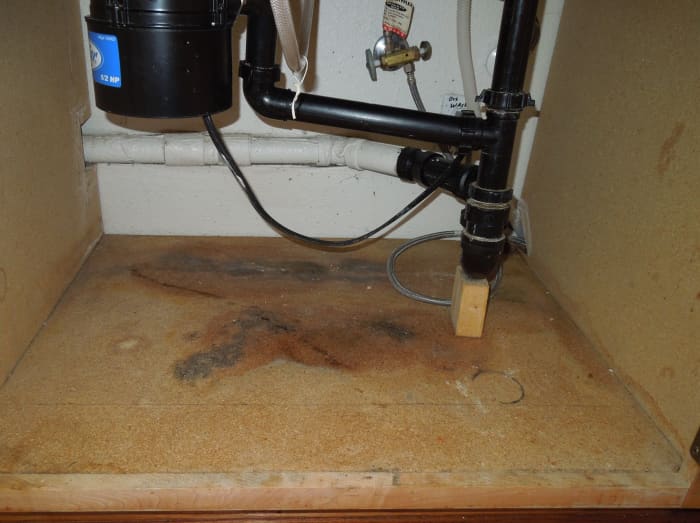
H2o Damaged Wood With Mold Under Kitchen Sink
by kittyjj
Got Water Damage Under Your Sink?
You're not alone. Wood and woods flooring is an easy target for water harm if it is non protected by waterproof materials such as plastic, vinyl, or tile. If the wood is non treated properly after water damage, mold could form and might create health hazards.
Luckily, replacing the rotted wood nether the kitchen sink tin can be a practise-information technology-yourself project if you take the right tools and a few hours to spare.
Replacing the Rotted Wood Nether the Kitchen Sink
by kittyjj
How to Supersede the Wood Under Your Kitchen Sink
If y'all detected the damage early and the areas affected by mold are pocket-sized, you probably tin just cut out those small areas with the mold and fill them dorsum with forest hardener.
If the mold has already spread more than half of the wood floor, so you might accept to supercede the woods floor under the sink. To do so, you could either rent a handyman, which costs you about $150, or you can tackle information technology yourself for less than $50.
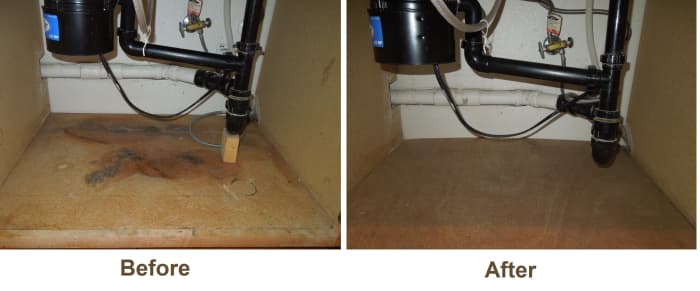
New Wood Replacement Under A Kitchen Sink
by kittyjj
Tools and Materials for Replacing a Board Underneath a Sink
If you lot want to replace the water damaged wood under the kitchen sink past yourself, prepare yourself with the following tools and materials:
- Power saw
- Mitt saw
- Power drill
- Bar clamp
- Hammer
- Flashlight
- Brush and dustpan
- Safety goggles
- Dust mask
- A right size wood board
- 2x4 lumber
- Screws
- Nails
Step-past-Stride Guide for Replacing the Wood Under Your Sink
- Remove all the items under the sink,
- Brush off any dust or garbage on the woods board under the sink,
- Exam the damage on the wood,
- Draw lines on the wood then that yous know exactly where to cut,
- Utilize a bar clamp to secure 2x4s to assist cutting a straight line more hands,
- Put on a pair of safety goggles to protect your eyes and a grit mask to forbid y'all from inhaling dust,
- If you are using a manus saw, effort to drill some holes to help starting time sawing more than easily.
- In that location should be an electric outlet under the kitchen sink for your power tool if yous need one,
- Using a power saw will definitely aid save you fourth dimension, only the motors of some of the ability saws can get overheated more easily and might finish working as a result. So make sure that yous give your power saw a interruption once in a while.
- Remount your bar clench accordingly every bit you work on different sections of the board,
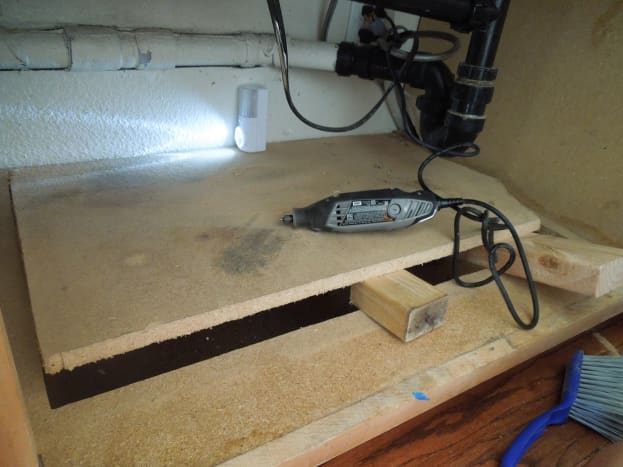
- If you worry at that place might exist a piece of wood underneath the board that you are cutting, you lot can cut an opening that is large plenty for you to place a photographic camera in and take some pictures or you can put your hand in to feel for it. This would give you a amend thought of how to cutting the board more than efficiently.
- Use a flashlight to assistance you see better when y'all need to cut the inner corners,
- Some power saws might not be able to aid you cut all the manner to the end of the board where the inner corners are, you might want to utilise a small hand saw or other smaller ability tool to handle that,
- When you lot are done cut the board, remove the rotted lath out of your way,
- Clean out all the garbage you can see after you've removed the rotted board,
- Utilize pieces of 2x4 lumber to make supporting structures for the new lath to sit on,
- Cut out the right size of a new board and put it on,
- Utilise a drill bit to create holes for screws, and secure the new lath with screws.
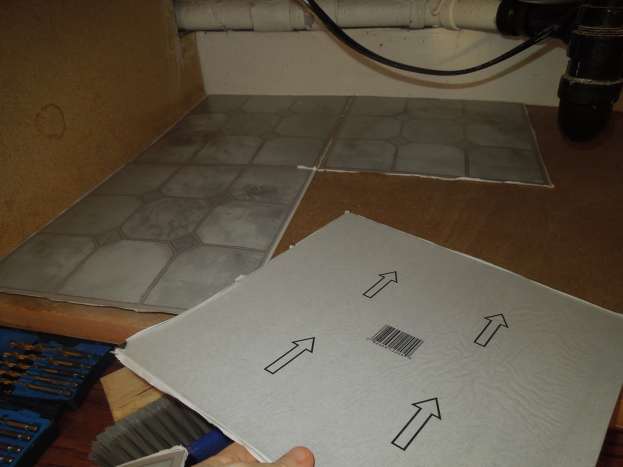
Using Self Agglutinative Vinyl Tiles for the Floor Nether the Kitchen Sink
Scroll to Go along
Read More than From Dengarden
How to Prevent Water Impairment to Forest Flooring Under a Sink
In lodge to prevent water damage to the wood floor under the kitchen sink in the future, you will need to cover the wood with waterproof materials such as plastic or vinyl.
You lot can buy a gyre of wide vinyl or plastic and cut them to size, or you lot tin buy a few pieces of vinyl tile. You also accept the pick of choosing mucilage-down vinyl tile or cocky-adhesive vinyl tile. If you lot are going to use self-adhesive vinyl tiles, hither are the steps:
- Make clean the surface of the lath
- Test out the layout of the vinyl tiles
- Describe lines on either side of the vinyl tiles as guidelines for cutting to the right sizes
- Employ a pair of scissors or utility knife to cutting the vinyl tiles
- Peel off the bankroll newspaper of the vinyl tiles and identify them in the correct position
- If the self-adhesive vinyl tiles don't stick well to the surface, employ the help of gum
- You lot can either apply the glue onto the board or on the dorsum of the vinyl tiles
- Optionally, y'all can employ pocket-size nails to help keep the vinyl tiles in place
- After you are done placing all the vinyl tiles, use waterproof sealant to seal along the edges.
Actress Water Proofing Is Always Recommended
After replacing the rotted forest with a new ane, add a layer of waterproof material to assist prevent hereafter water impairment. You can use plastic or vinyl or anything that works all-time for you.
We used vinyl tiles for this project because nosotros thought information technology was convenient. They are easy to put on just require extra mucilage and nails to aid them stay on. We also used clear and waterproof caulk to seal forth edges. Maybe we should have bought one large slice of vinyl instead!
This commodity is accurate and true to the best of the author'south cognition. Content is for informational or entertainment purposes simply and does not substitute for personal counsel or professional advice in business organization, financial, legal, or technical matters.
© 2022 Ann Leung
Ann Leung (author) from San Jose, California on Oct 01, 2022:
I am glad that nosotros did the work ourselves. Information technology turned out a lot easier that we thought. It also salvage united states of america money too.
Thank you for the voted up!
Marcy Goodfleisch from Planet World on September 29, 2022:
These are cracking step-by-step details! What a helpful hub! I need to replace the boards nether my sink, so I will be referring back to this hub. Thanks for the tips and guidelines!
Voted upwardly and upwards!
Source: https://dengarden.com/home-improvement/How-to-Replace-Rotted-Wood-Under-A-Kitchen-Sink
0 Response to "How To Repair Water Damaged Wood Under Sink"
Post a Comment